Using SmartPeak
SmartPeak comes in different flavors to satisfy users’ needs. The SmartPeakGUI is ideal for most usecases since it offers an easy-to-use graphical user interface, advanced plotting capabilities and session saving and restoring, while the commandline version offers fast and easy to use data processing from a PC or a remote server with abundant computational resources. For larger data processing piplines, SmartPeak Team is offering a light weight yet powerful SmartPeakServer which can be deployed to a HPC cluster to perform larger computations and connected remotely to SmartPeakGUI for a seamless user experience.
Using SmartPeak GUI
This page describes the graphical user interface (GUI) for working with SmartPeak. SmartPeak GUI provides functionality to facilitate users to get up and running as quickly as possible. SmartPeak GUI also provides various graphical views and plots to enable faster debugging and configuration of workflows and algorithms. After installation of SmartPeak on Windows, MacOS, and/or Linux, a shortcut should be available for quickly launching the application.
Path to logs
Default locations of logs:
Windows:
C:\Users\<user>\AppData\Local\SmartPeakLinux and MacOS:
~/.SmartPeak
User can change default location and specify directory where the logs are stored by setting SMARTPEAK_LOGS env variable.
If directory specified by the path doesn’t exist, SmartPeak will create it.
Load session and run workflow
Start the session with
File | New Session.Choose your working directory with
Change dir.When workflow successfully opens, run workflow with
Actions | Run workflow.
Integrity checks
The integrity of the loaded data can be checked with Actions | Integrity checks and select one option.
The results of the integrity checks can be viewed with View | Info.
Todo
Describe Integrity checks options..
Edit the workflow
You have an option to select the custom workflow or to choose the predefined set of operations.
Drag and drop steps of workflow to change their order, add or remove steps. Description of each step is available in the pop-up window.

View features
View and verify the workflow steps and input files with
View | Workflow.

The explorer panes can be used to filter the table views with
View | Injections or Transitions. Click on the checkbox under plot or table to include or exclude the injection or tansition from the view.

Changes to any of the input files can be made by reloading a modified .csv version of the file with
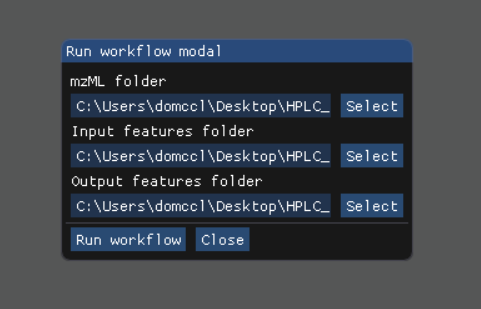
File | Import File.Run the workflow with
Actions | Run workflow. Verify or change the data input/output directories before running the workflow.
The status of the workflow can be monitored with
View | Info.

Alternatively, a more detailed status can be obtained with
View | Logwhich will display the most recent SmartPeak log information.

After the workflow has finished, the results can be viewed in a tabular form as a large data table with
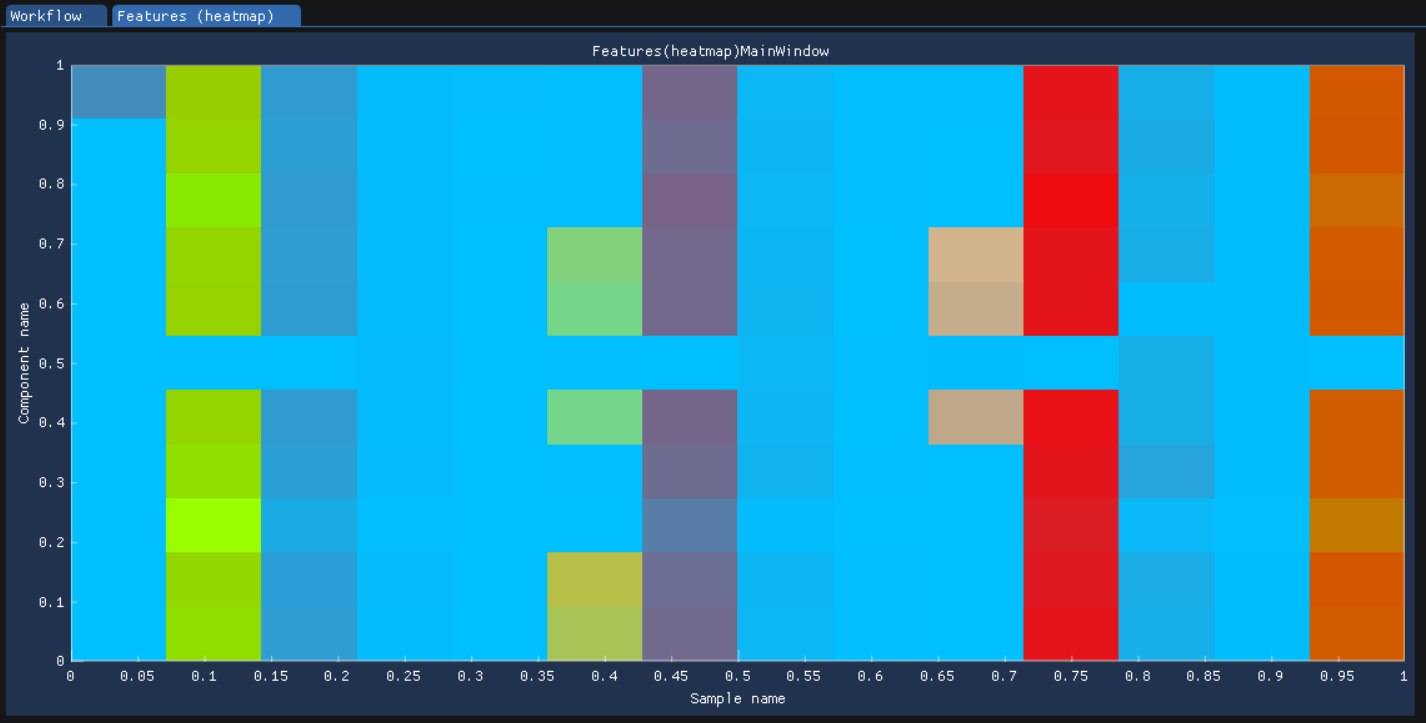
View | features (table). The feature metavalues shown can be added or removed withView | Featuresand clicking on the checkboxes under plot or table. For performance reasons, the amount of data that one can view is limited to 5000 entries.The results can be viewed in a graphical form as a line plot or as a heatmap with
View | features (line).

or View | features (heatmap)
The underlying data can also be displayed as a table matrix with
View | features (matrix). Samples, transitions, or feature metavalues can be included or excluded from any of the views using the explorer panes.

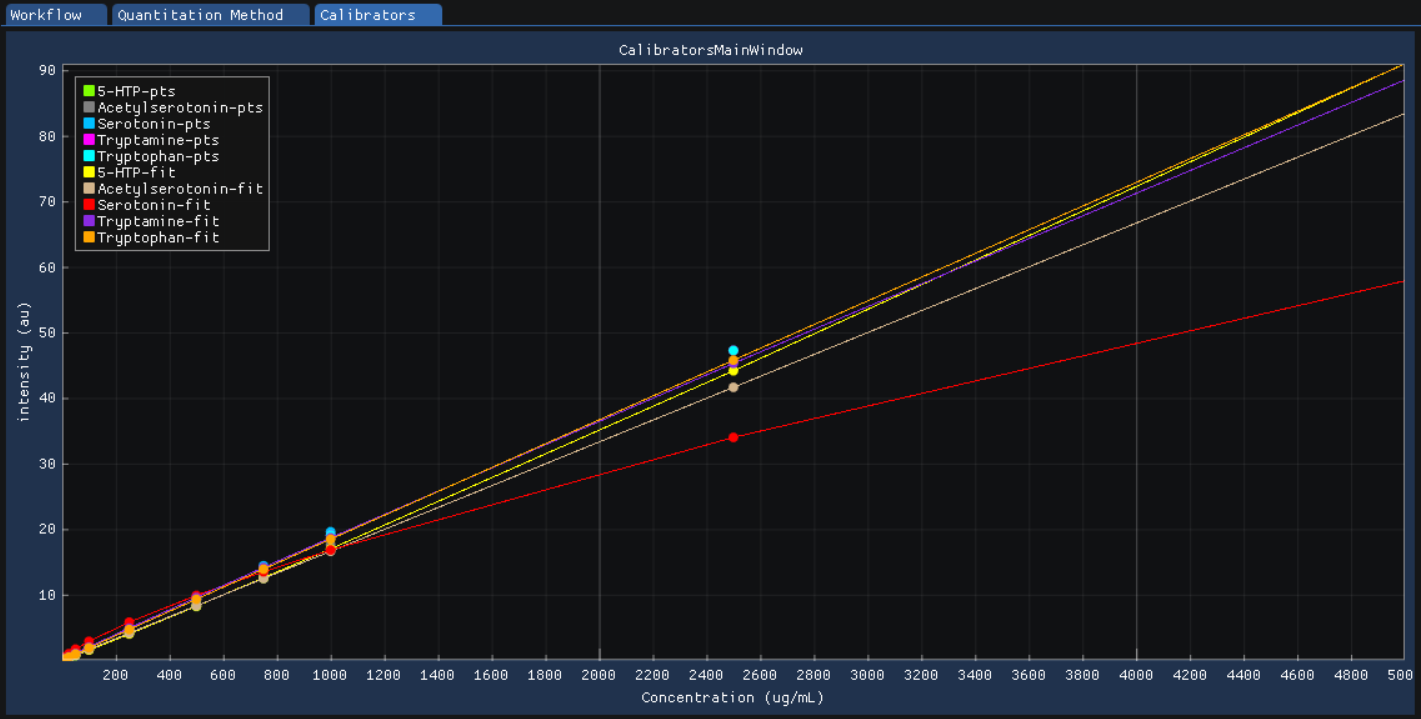
The results of calibration curve fitting can be inspected with
View | Workflow settings | Quant Methods.

A detailed look at the calibration fitted model and selected points for the model can be seen with
View | Calibrators.
For debugging problematic peaks, the raw chromatographic data and the picked and selected peaks can be viewed graphically with
View | Chromatograms. For performance reasons, the amount of data that one can view is limited to 9000 points.

Export report
You can export the report with Actions | Report. In the pop-up window select the information you want to include in the report, e.g. Sample types and Metadata.

The report is saved in the same location as the sequence.csv file.
Todo
Explain the difference in options: Create FeatureDB.csv and Create PivotTable.csv.
Using SmartPeak CLI
This page describes command line tool for working with SmartPeak. SmartPeak CLI provides an equivalent of SmartPeak GUI application, however with a possibility to run in headless mode.
Note
Currently SmartPeak CLI does not generate any graphical files.
Load session
SmartPeak CLI requires only one parameter load-session to start running a workflow.
All other parameters are optional and can be specified to customize settings.
The parameter accepts a path to a session file (ex: session.db) file, created from SmartPeakGUI.
It’s also possible to give a session directory that would have a specific directory and file naming organisation as a parameter. This solution however should not be preferred.
An An example below:
In Powershell
./SmartPeakCLI --load-session C:/data/GCMS_SIM_Unknowns/session.db
./SmartPeakCLI --load-session C:/data/GCMS_SIM_Unknowns
In Bash
./SmartPeakCLI --load-session $HOME/data/GCMS_SIM_Unknowns/session.db
./SmartPeakCLI --load-session $HOME/data/GCMS_SIM_Unknowns
Export reports
After running a workflow, SmartPeak offers saving the result of the computation in concise csv files.
By default all possible reports will be exported, i.e. PivotTable and FeatureDB.
However user can decide which report type to save using --report option.
It is still possible to specify both with this option, e.g. --report pivottable featuredb.
If --output-features path is not given, the files are written to current working directory.
In Powershell
./SmartPeakCLI
    --load-session C:/data/GCMS_SIM_Unknowns
    --report featuredb
In Bash
./SmartPeakCLI \
    --load-session $HOME/data/GCMS_SIM_Unknowns \
    --report featuredb
Note
Notice that values for --report are case insensitive, therefore user can use featuredb as well as FeatureDB.
Output directory
In order to save files in specific location, set an --output-features path (relative or absolute), or –reports-out-dir for the reports directories.
In Powershell
./SmartPeakCLI
    --load-session C:/data/GCMS_SIM_Unknowns
    --report featuredb
    --reports-out-dir $HOME/data/reports
    --output-features $HOME/data/output_features
In Bash
./SmartPeakCLI \
    --load-session $HOME/data/GCMS_SIM_Unknowns \
    --report featuredb \
    --reports-out-dir $HOME/data/reports
    --output-features $HOME/data/output_features
Warning
Notice that if given a path to non-existing directory, SmartPeak will attempt to create one.
In case of insufficient access permission or other potential errors, CLI tool will exit with status 1 before running the workflow.
Specify report sample types
By default SmartPeak includes all the sample types available in the report. The option --report-sample-types allows to reduce this set.
Values are space separated list, case insensitive.
In Powershell
./SmartPeakCLI
    --load-session C:/data/GCMS_SIM_Unknowns
    --report featuredb
    --report-sample-types standard blank qc
    --reports-out-dir $HOME/data/reports
    --output-features $HOME/data/output_features
In Bash
./SmartPeakCLI \
    --load-session $HOME/data/GCMS_SIM_Unknowns \
    --report featuredb \
    --report-sample-types standard blank qc \
    --reports-out-dir $HOME/data/reports \
    --output-features $HOME/data/output_features
Note
List of all possible sample types can be found here: sample-types.
Warning
SmartPeak validates values for the --report-sample-types option before running the workflow.
In case of incorrect value, the process exits with status 1.
Specify report meta-data
Similarly to sample-types, the meta-data can also be listed as a command line option --report-metadata.
The same rules applies, an example below.
In Powershell
./SmartPeakCLI
    --load-session C:/data/GCMS_SIM_Unknowns
    --report featuredb
    --report-metadata peak_area logSN RT
    --reports-out-dir $HOME/data/reports
    --output-features $HOME/data/output_features
In Bash
./SmartPeakCLI \
    --load-session $HOME/data/GCMS_SIM_Unknowns \
    --report featuredb \
    --report-metadata peak_area logSN RT \
    --reports-out-dir $HOME/data/reports \
    --output-features $HOME/data/output_features
Note
List of all possible values can be found here: What types of feature metadata does SmartPeak record?.
Warning
SmartPeak validates values for the --report-metadata option before running the workflow.
In case of incorrect value, the process exits with status 1.
Override workflow
The default workflow setting is loaded from the workflow.csv, the file location is the same as sequence.csv.
The CLI tool allows to modify the list of commands inline with an option --workflow.
In Powershell
./SmartPeakCLI
    --load-session C:/data/GCMS_SIM_Unknowns
    --report featuredb
    --report-metadata peak_area logSN RT
    --workflow  LOAD_RAW_DATA
                MAP_CHROMATOGRAMS
                EXTRACT_CHROMATOGRAM_WINDOWS
                ZERO_CHROMATOGRAM_BASELINE
                PICK_MRM_FEATURES
                SELECT_FEATURES
                STORE_FEATURES
    --reports-out-dir $HOME/data/reports
    --output-features $HOME/data/output_features
In Bash
./SmartPeakCLI \
    --load-session $HOME/data/GCMS_SIM_Unknowns \
    --report featuredb \
    --report-metadata peak_area logSN RT \
    --workflow  LOAD_RAW_DATA \
                MAP_CHROMATOGRAMS \
                EXTRACT_CHROMATOGRAM_WINDOWS \
                ZERO_CHROMATOGRAM_BASELINE \
                PICK_MRM_FEATURES \
                SELECT_FEATURES \
                STORE_FEATURES \
    --reports-out-dir $HOME/data/reports \
    --output-features $HOME/data/output_features
Note
The full list of commands with short descriptions is included here: What are the different types of data processing workflows that SmartPeak supports?.
Warning
SmartPeak validates values for the --workflow option before running the process.
Note that values are case-insensitive. When incorrect value given, the error status 1 is returned.
Run integrity checks
SmartPeak CLI allows to run several integrity checks before the workflow.
By default no checs are performed, user can list them using --integrity option.
If at least one verification fails, the process will exit with status code 1.
However, user can modify this behaviour with --allow-inconsistent flag,
which forces SmartPeak to continue with the workflow even if one or more integrity checks failed.
In Powershell
./SmartPeakCLI
    --load-session C:/data/GCMS_SIM_Unknowns
    --report featuredb
    --integrity SAMPLE COMP_GROUP
    --allow-inconsistent
    --reports-out-dir $HOME/data/reports
    --output-features $HOME/data/output_features
In Bash
./SmartPeakCLI \
    --load-session $HOME/data/GCMS_SIM_Unknowns \
    --report featuredb \
    --integrity SAMPLE COMP_GROUP \
    --allow-inconsistent \
    --reports-out-dir $HOME/data/reports \
    --output-features $HOME/data/output_features
Note
Refer to list of integrity checks here: What do the integrity checks do?.
Full List of CLI Parameters
Available parameters:

-h    --help

This parameter is optional. The default value is ''.

-l    --load-session  (required)
The path to a session file, or to a directory with a structured file organization (session file is preferred)

-r    --report
Specify a report type to export.
This parameter is optional. The default value is '[ FeatureDB PivotTable ]'.

-rt   --report-sample-types
A list of sample types to include in the report. The full list can be found in the documentation https://smartpeak.readthedocs.io
This parameter is optional. The default value is '[ ALL ]'.

-rm   --report-metadata
A list of metadata to include in the report. The full list can be found in the documentation https://smartpeak.readthedocs.io
This parameter is optional. The default value is '[ ALL ]'.

-ro   --reports-out-dir
An absolute or relative path to an output directory for reports. Overrides the default location which is the current working directory. SmartPeak will create the given directory if one does not exist.
This parameter is optional. The default value is '.'.

-w    --workflow
The workflow sequence as a list of commands, e.g. LOAD_DATA MAP_CHROMATOGRAMS ... Overrides the workflow settings loaded from the sequence file (with option --load-session)
This parameter is optional. The default value is '[ ]'.

-t    --integrity
Specify which integrity checks to run, available are: SAMPLE, COMP, COMP_GROUP, IS and ALL (runs all listed).
This parameter is optional. The default value is '[ NONE ]'.

-a    --allow-inconsistent
Given that any integrity checks were specified with '--integrity', this option allow to run workflow even if one or more check has failed.
This parameter is optional. The default value is '0'.

-v    --verbose
Run SmartPeak in verbose mode, display more detailed information
This parameter is optional. The default value is '0'.

-d    --disable-colors
By default the console output is colored, this flag disables colors.
This parameter is optional. The default value is '0'.

-pg   --disable-progressbar
Progress bar allows tracks the progress of the entire workflow. This option disables the progress bar.
This parameter is optional. The default value is '0'.

-ld   --log-dir
The path to the log directory. The given directory has to exist. Overrides the default location for the log file: https://smartpeak.readthedocs.io/en/latest/guide/guistart.html#logs
This parameter is optional. The default value is ''.

-o    --output-features
An absolute or relative path to an output directory. Overrides the default location which is the current working directory. SmartPeak will create the given directory if one does not exist.
This parameter is optional. The default value is './features'.

-i    --input-features
An absolute or relative path to the input features directory. Overrides the default location which is the current working directory.
This parameter is optional. The default value is './features'.

-z    --mzml
An absolute or relative path to the mzML directory. Overrides the default location which is the mzML folder under the current working directory. SmartPeak will create given directory if one does not exist.
This parameter is optional. The default value is './mzML'.

-f    --input-file
Override input file. Ex: -f featureQCComponents="./featureQCComponents_new.csv".
This parameter is optional. The default value is '[ ]'.

-p    --parameter
Override parameter. Ex: '-p MRMFeatureFinderScoring:TransitionGroupPicker:peak_integration=smoothed'.
This parameter is optional. The default value is '[ ]'.
Running SmartPeakCLI from a container
You can also pull the smartpeak-cli container and run workflows in it, to do so please use the following commands depending on your OS.
In Powershell
docker run --rm -ti -v C:/data:/sample-data autoflowresearch/smartpeak-cli:latest bash
In Bash
docker run --rm -ti -v $HOME/data:/sample-data autoflowresearch/smartpeak-cli:latest bash
The previous commands will pull the required image locally, mounts C:/data or $HOME/data to /sample-data in the container and destroys the container once exited (please omit --rm if you don’t wish to do so).
Inside the container you can execute SmartPeakCLI following the examples mentioned above.
Using SmartPeak Server
This page describes the remote server for scaling SmartPeak to large and computationally demanding workflows using high performance computing (HPC) resources. The SmartPeak Server utilizes containerization and gRPC to enable users to connect, control, and view a remote session using the SmartPeak GUI. An IT administrator would most likely be required to set-up the remote server on the HPC resources and ensure file transfer and security are in place. The SmartPeak team maintains containerized versions of the SmartPeak CLI and Server on DockerHub that are required for setting up the workers and server, respectively.
Todo
Describe the functionality of the SmartPeak Server.
Todo
Describe how to set-up the SmartPeak Server as an IT administrator.
Todo
Describe how to connect to the SmartPeak Server as a user.
Warning
SmartPeak Server is currently experimental!